
Omni Toolbox — Excel Online Manual
This manual describes how to enable the Omni Toolbox add-in for a spreadsheet in Excel Online (Excel for the web), using the hosted deployment at omni-toolbox-latest.bemisc.com.
Prerequisites
- A Microsoft account with access to Excel Online
- An Omni account (username and password) with access to the target Omni instance
- The workbook you want to use the toolbox with, opened in Excel Online
1. Download the add-in manifest
The deployment serves the Office add-in manifest, already configured with the correct URLs, at:
https://omni-toolbox-latest.bemisc.com/manifest.xml
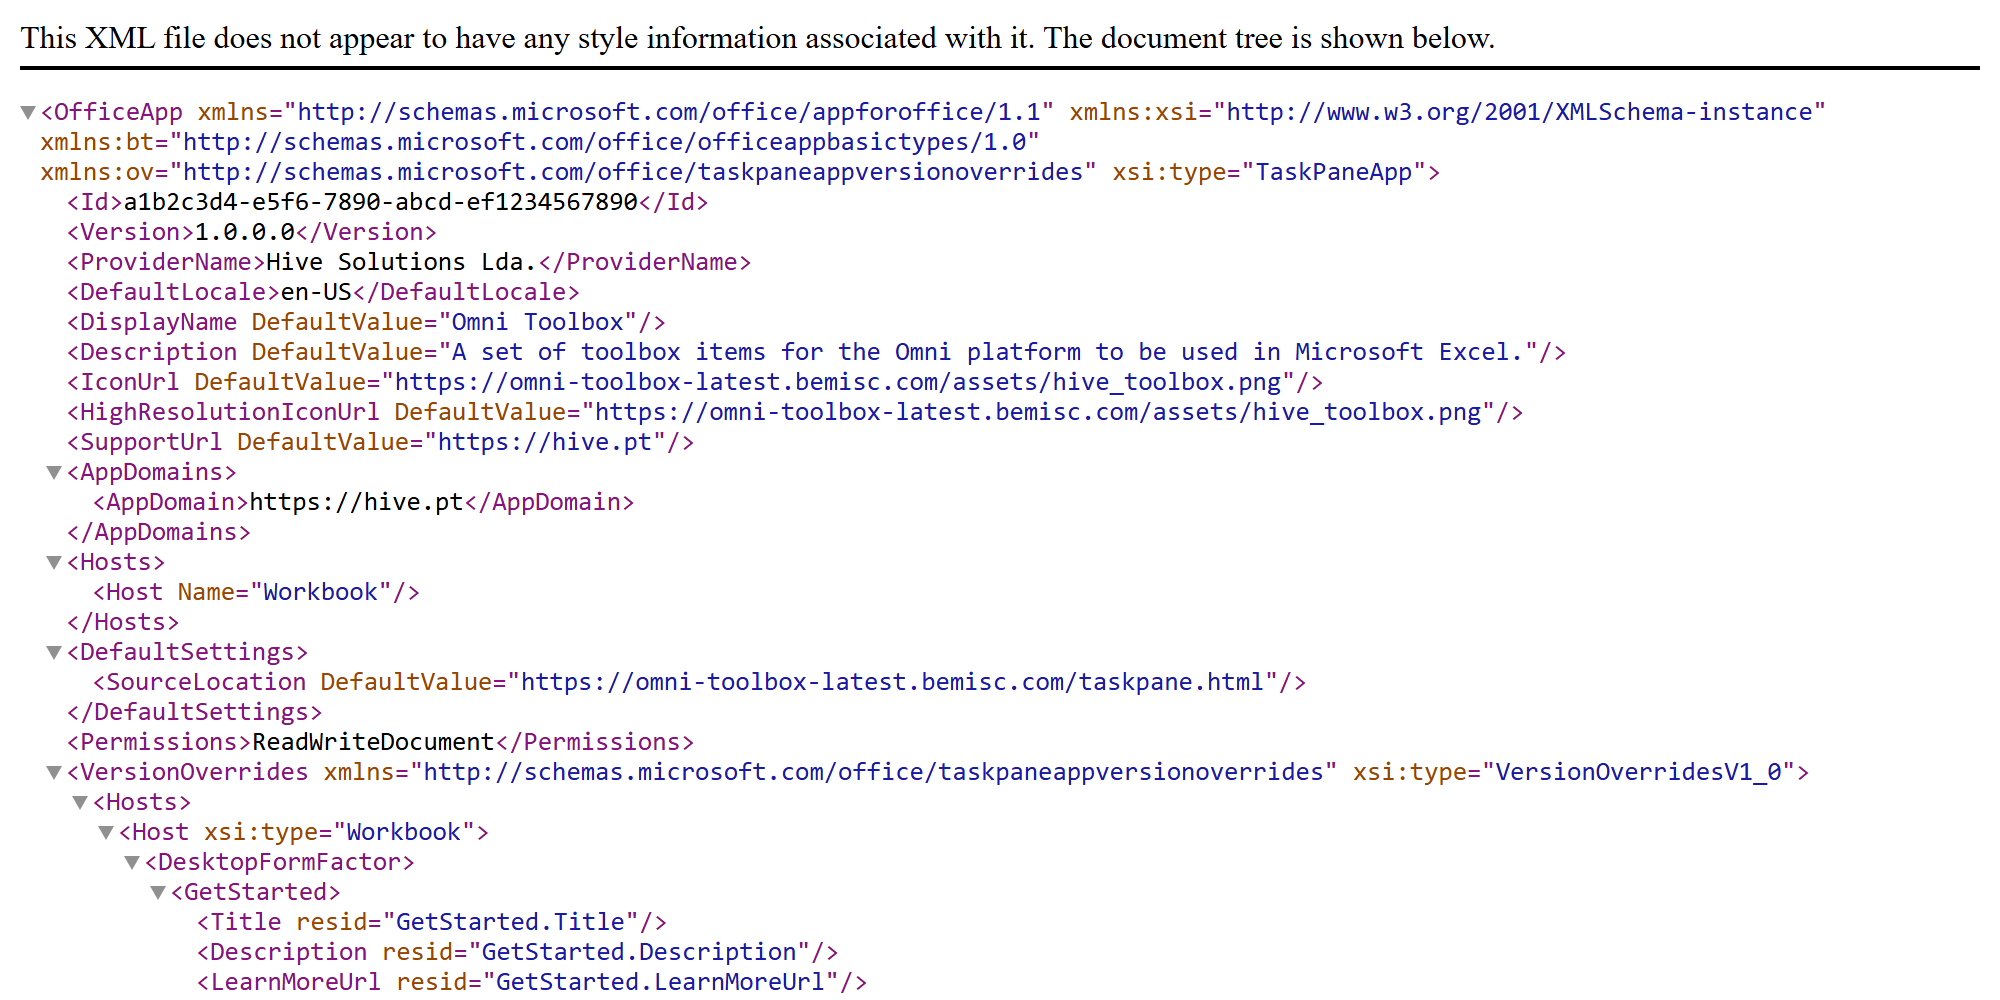
Open that URL in your browser and save the file locally as manifest.xml (right-click → Save as…, or press Ctrl+S). Opened directly in a browser tab it looks like this:
2. Upload the manifest to Excel Online
The full click path on the ribbon is:
Home → Add-ins → More Add-ins → MY ADD-INS → Upload My Add-in → Browse… → Upload
Step by step:
- Open (or create) a workbook in Excel Online.
- On the Home tab of the ribbon, click Add-ins.
- In the popup, click More Add-ins (or More Settings → Office Add-ins, depending on the UI version).
- In the Office Add-ins dialog, select the MY ADD-INS tab.
- Click the Upload My Add-in link in the top-right corner of the dialog.
- Click Browse…, select the
manifest.xmlfile downloaded in step 1, and click Upload.
After the upload, an Omni Toolbox group appears on the Home tab of the ribbon with four buttons:
- Show Toolbox — opens the taskpane
- Insert Document — creates and inserts a purchase document
- Reset Sheet — resets the current sheet to its default state
- Print Labels — prints product labels for the current items
Note: a manifest uploaded this way is a sideload — it applies to the current workbook session only. If the ribbon buttons are gone after reopening the workbook, simply repeat the upload steps. For a permanent, organization-wide installation the manifest should be deployed via the Microsoft 365 admin center (Integrated apps → Upload custom apps).
3. Connect to Omni
On the ribbon, click Home → Omni Toolbox → Show Toolbox. The taskpane opens on the right side with the configuration form:
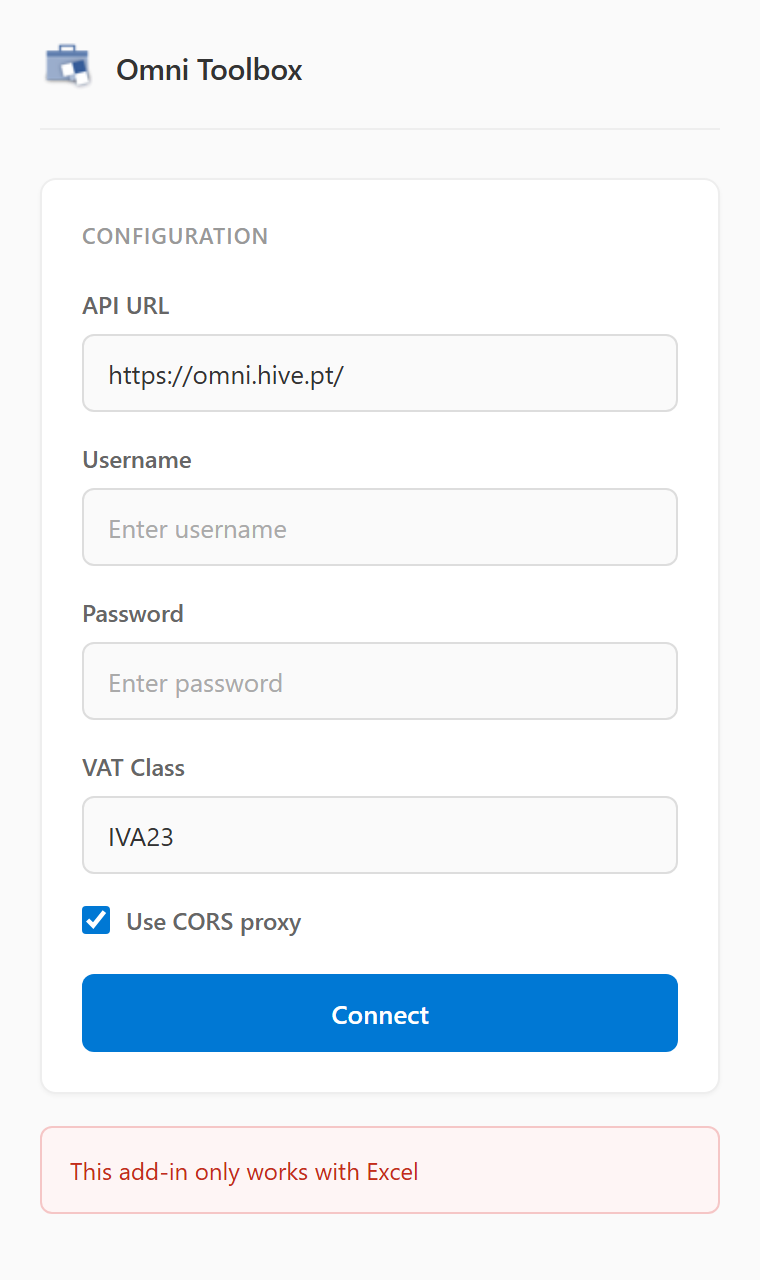
Fill in the connection details:
| Field | Description |
|---|---|
| API URL | Base URL of the Omni API instance (defaults to https://omni.hive.pt/) |
| Username | Your Omni account username |
| Password | Your Omni account password |
| VAT Class | The VAT class to apply in calculations (defaults to IVA23) |
| Use Proxy | Keep checked unless the Omni instance serves the proper CORS headers for the add-in origin |
| Digitizer URL | Base URL of the Digitizer instance that reads the scanned documents, optional (the import panel only shows with it) |
| Digitizer Key | Secret key of the Digitizer instance, optional |
Click Connect. The credentials are validated against the Omni API and stored locally, so the add-in reconnects automatically the next time the taskpane opens.
4. Use the toolbox
Once connected, the taskpane shows the actions panel:
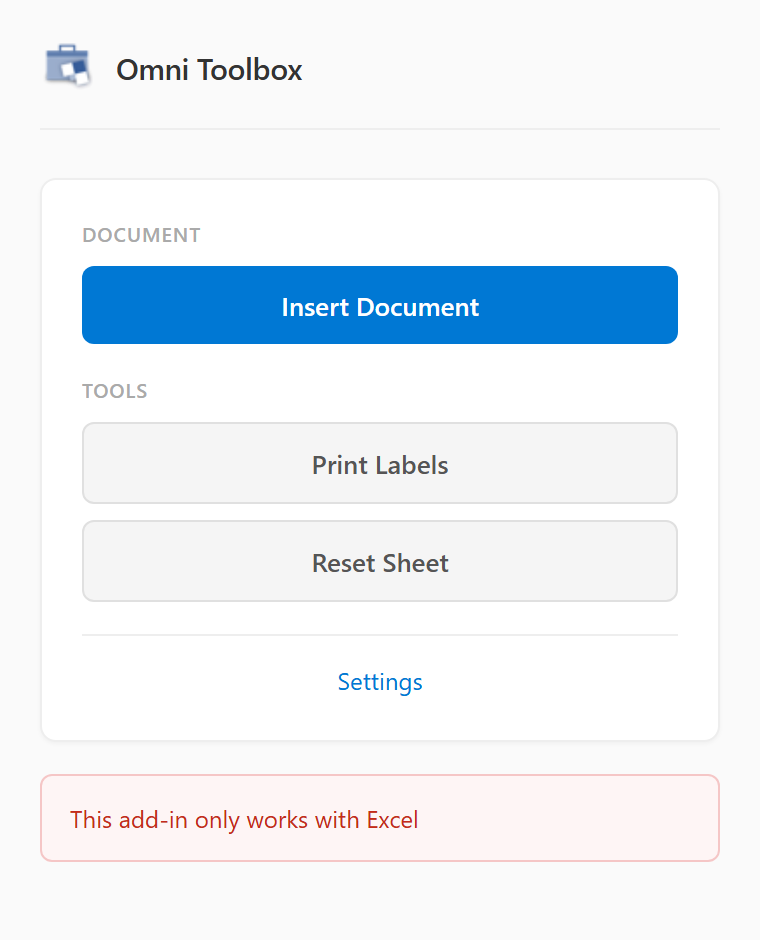
- Insert Document — creates the purchase/consignment document in Omni from the current sheet contents; while the prices of the last document of the sheet are still to be resumed (see section 6) it refuses to create it again, until they are resumed or the sheet is reset
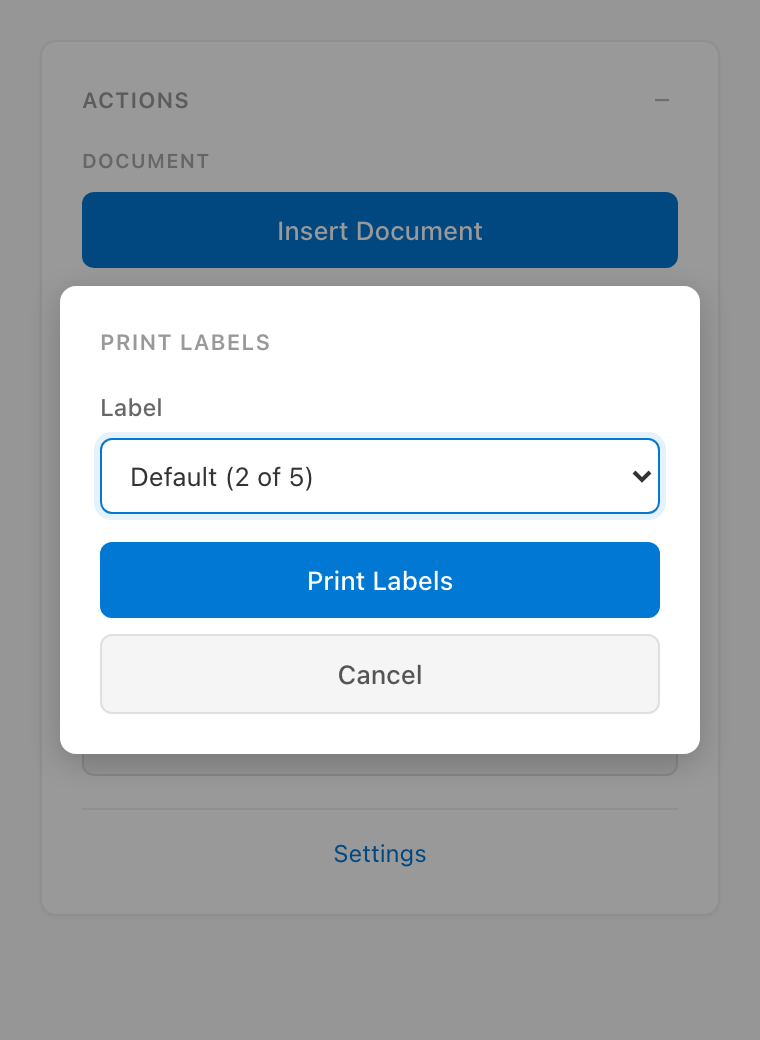
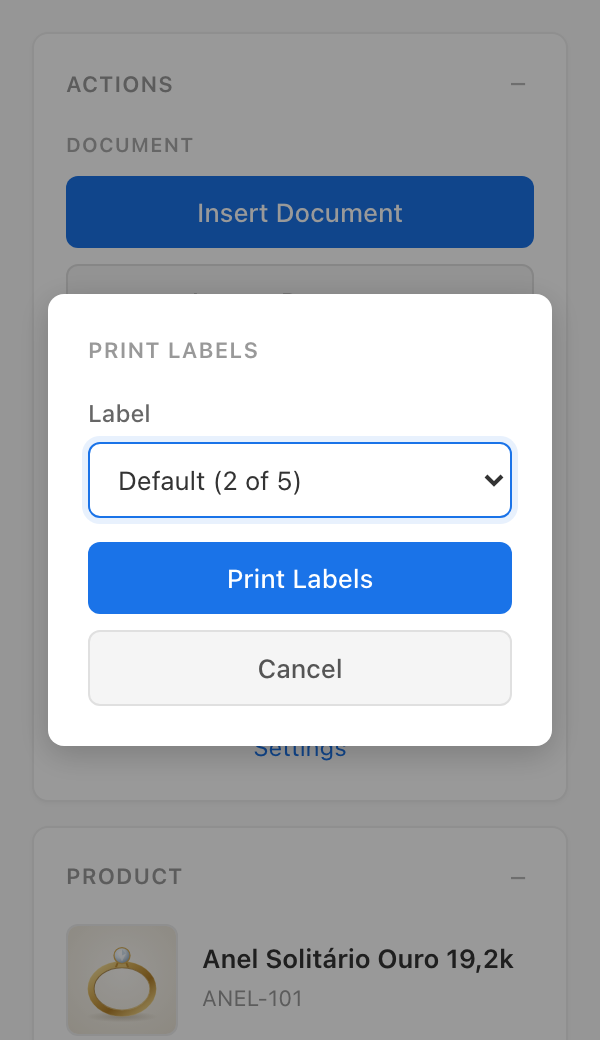
- Print Labels — generates and prints product labels for the current items, asking first for the Label, the template they are printed with (the ones Omni offers, Default being the one of its settings); on the products sheet it asks for the store whose prices the labels carry too (see section 8). The Print Labels button of the ribbon opens the taskpane to ask for them
- Reset Sheet — clears the sheet back to its default state (asks for inline confirmation), restoring its layout and colors and forgetting the prices of its last document still to be resumed
- Update Products: writes the products listed by the products sheet to Omni, enabled only while that sheet is focused (see section 8)
- Create Products Sheet: adds the products sheet to the workbook, or goes to it when the workbook already has it
- Settings — shows the current connection info (server, user, VAT class), turns the proxy and the cursor navigation of the desktop add-in on or off and allows reconnecting or disconnecting
Print Labels opens a picker over the panels, the label last printed with being selected again:
In the Google Sheets add-on the sidebar asks the same way, the Print Labels item of the menu opening it on the picker:
From here, product lookups, price calculations (VAT, margins, discounts, quantity/weight modes) and cell formatting react live to the cells you edit, mirroring the behavior of the original desktop add-in.
5. Inspect the selected product
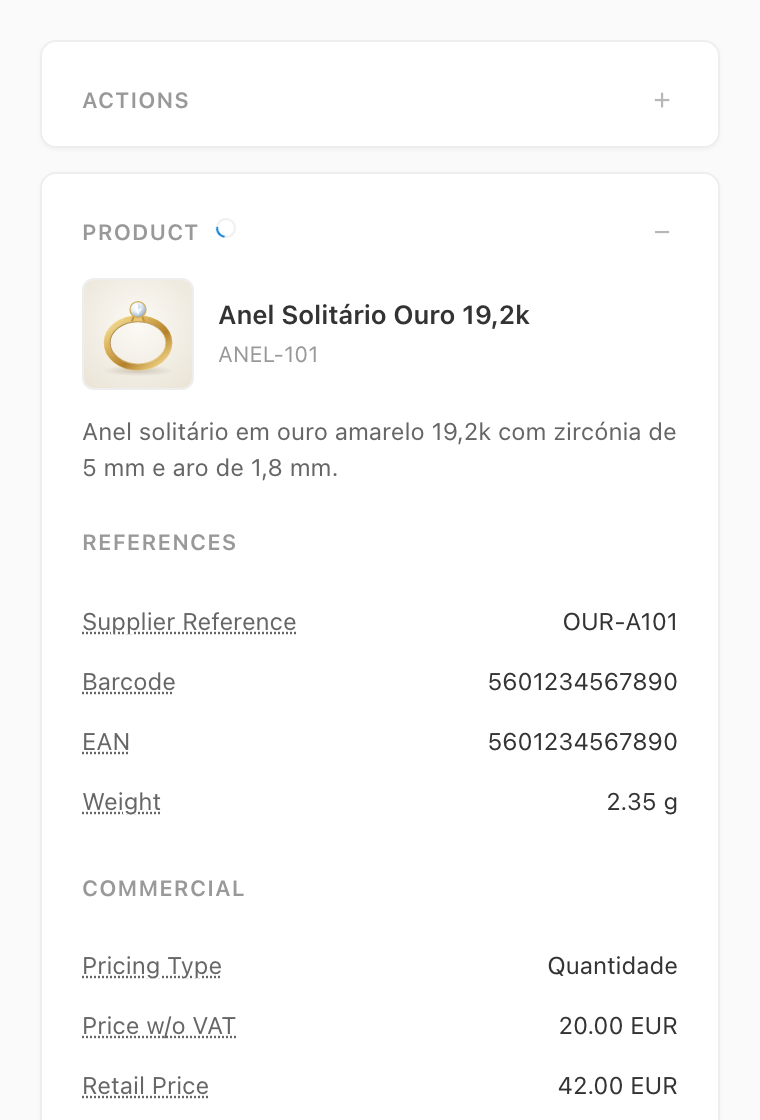
Selecting a cell of a line whose product code is known shows a Product panel below the actions, describing the product as Omni holds it:
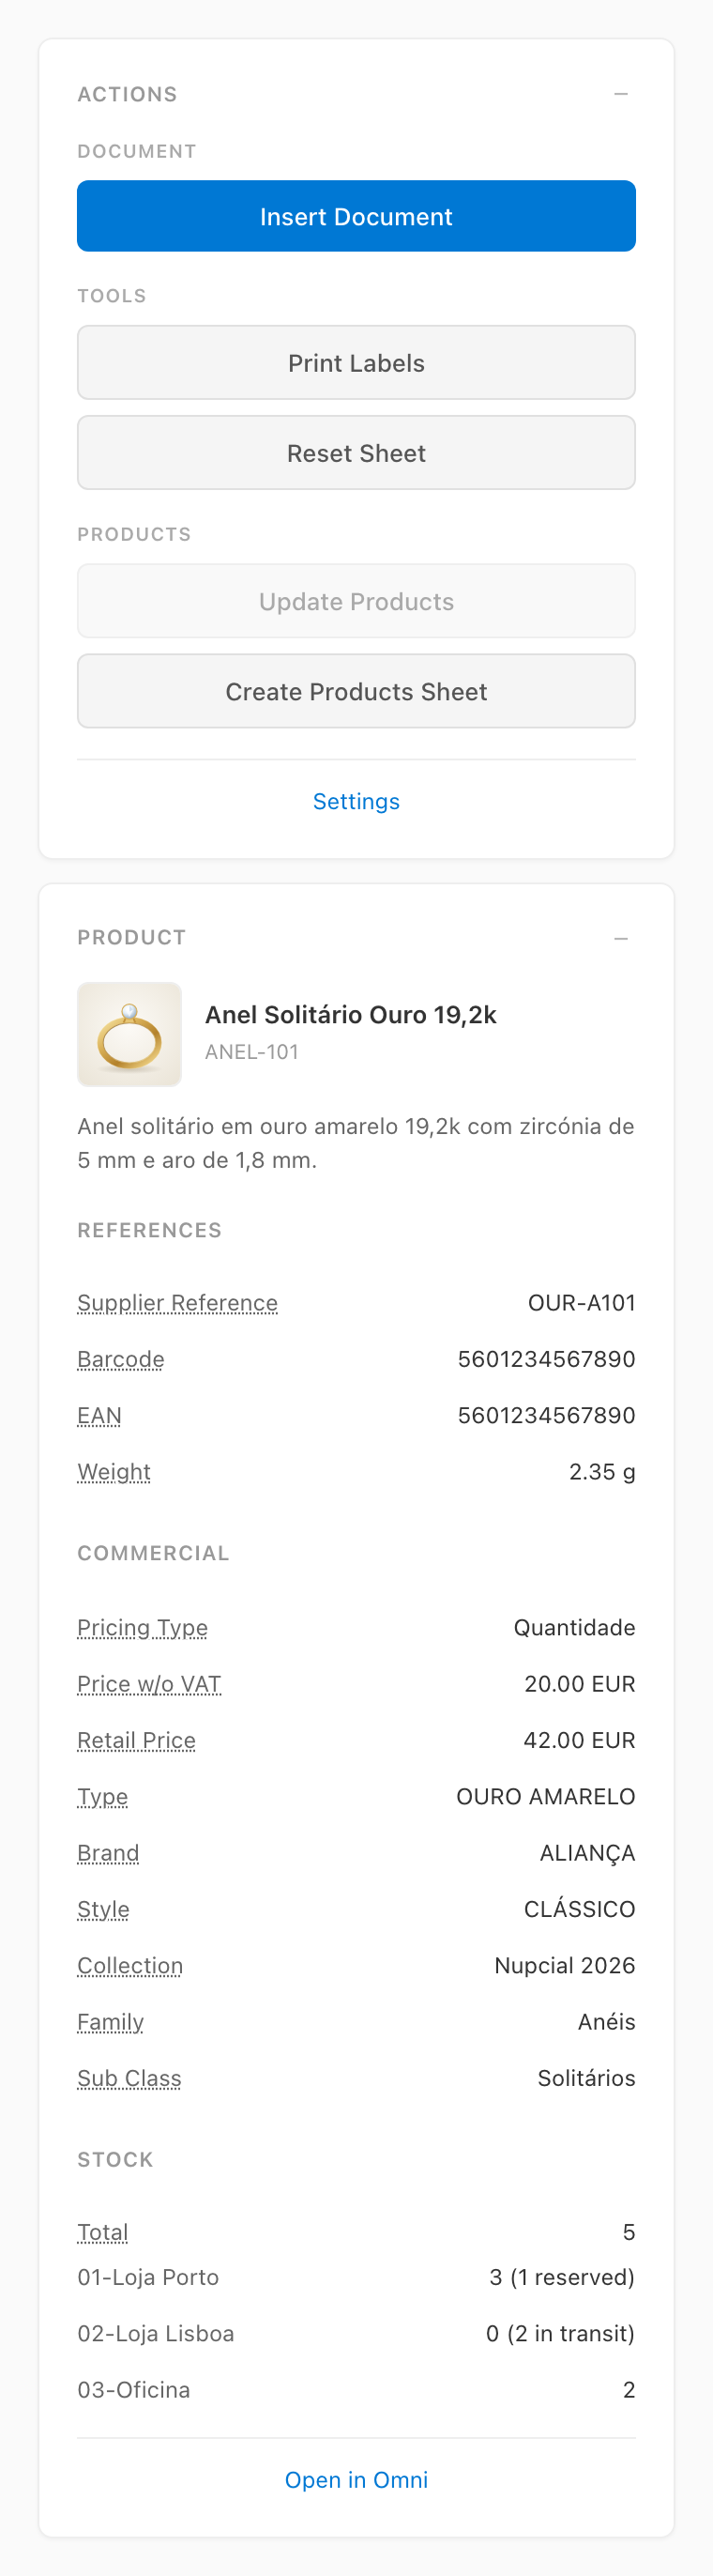
The panel follows the cursor, is read apart from the calculation of the line (it never delays an edit) and leaves out the fields the product has no value for. A subproduct line describes the product it belongs to, and Open in Omni opens the product page of the instance in a new tab. The rows of the products sheet are described the same way (see section 8).
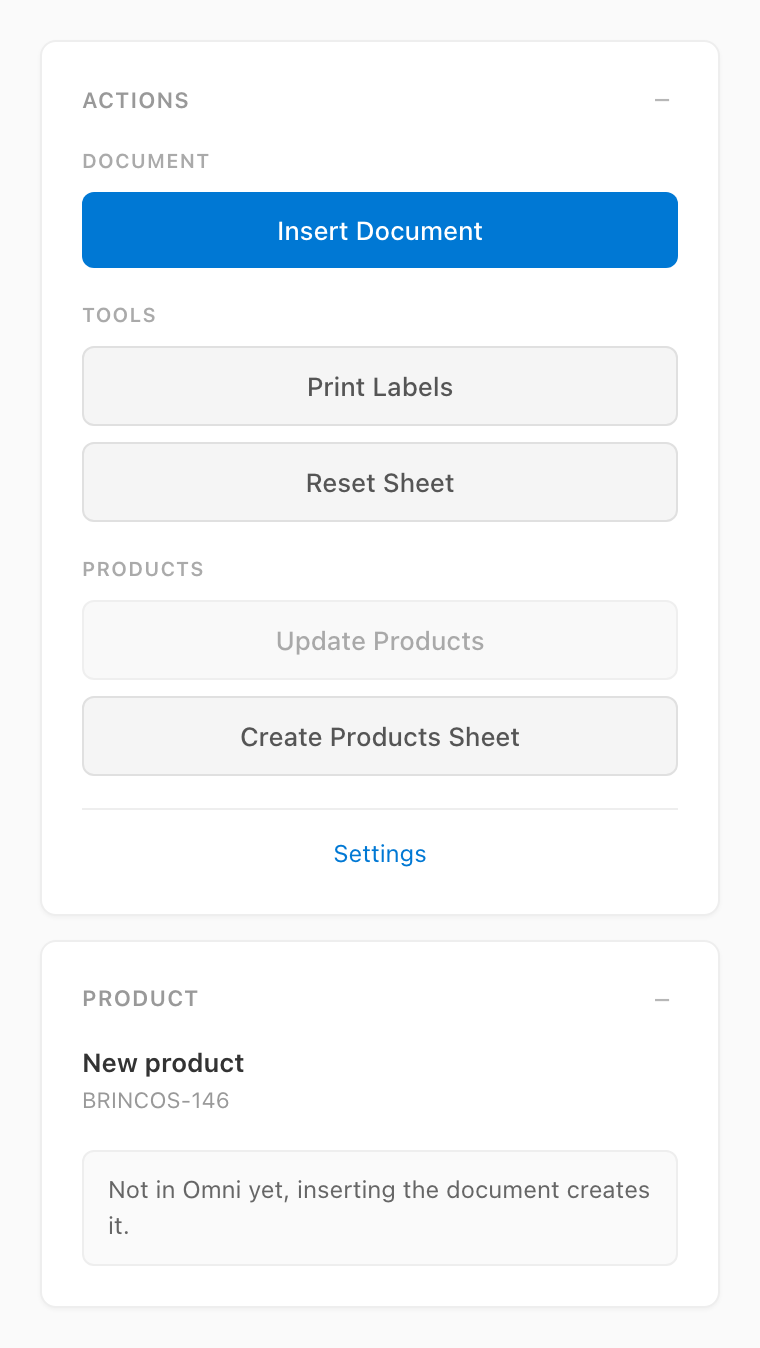
A code Omni does not know yet is the product the document will create, and the panel says so instead of describing it:
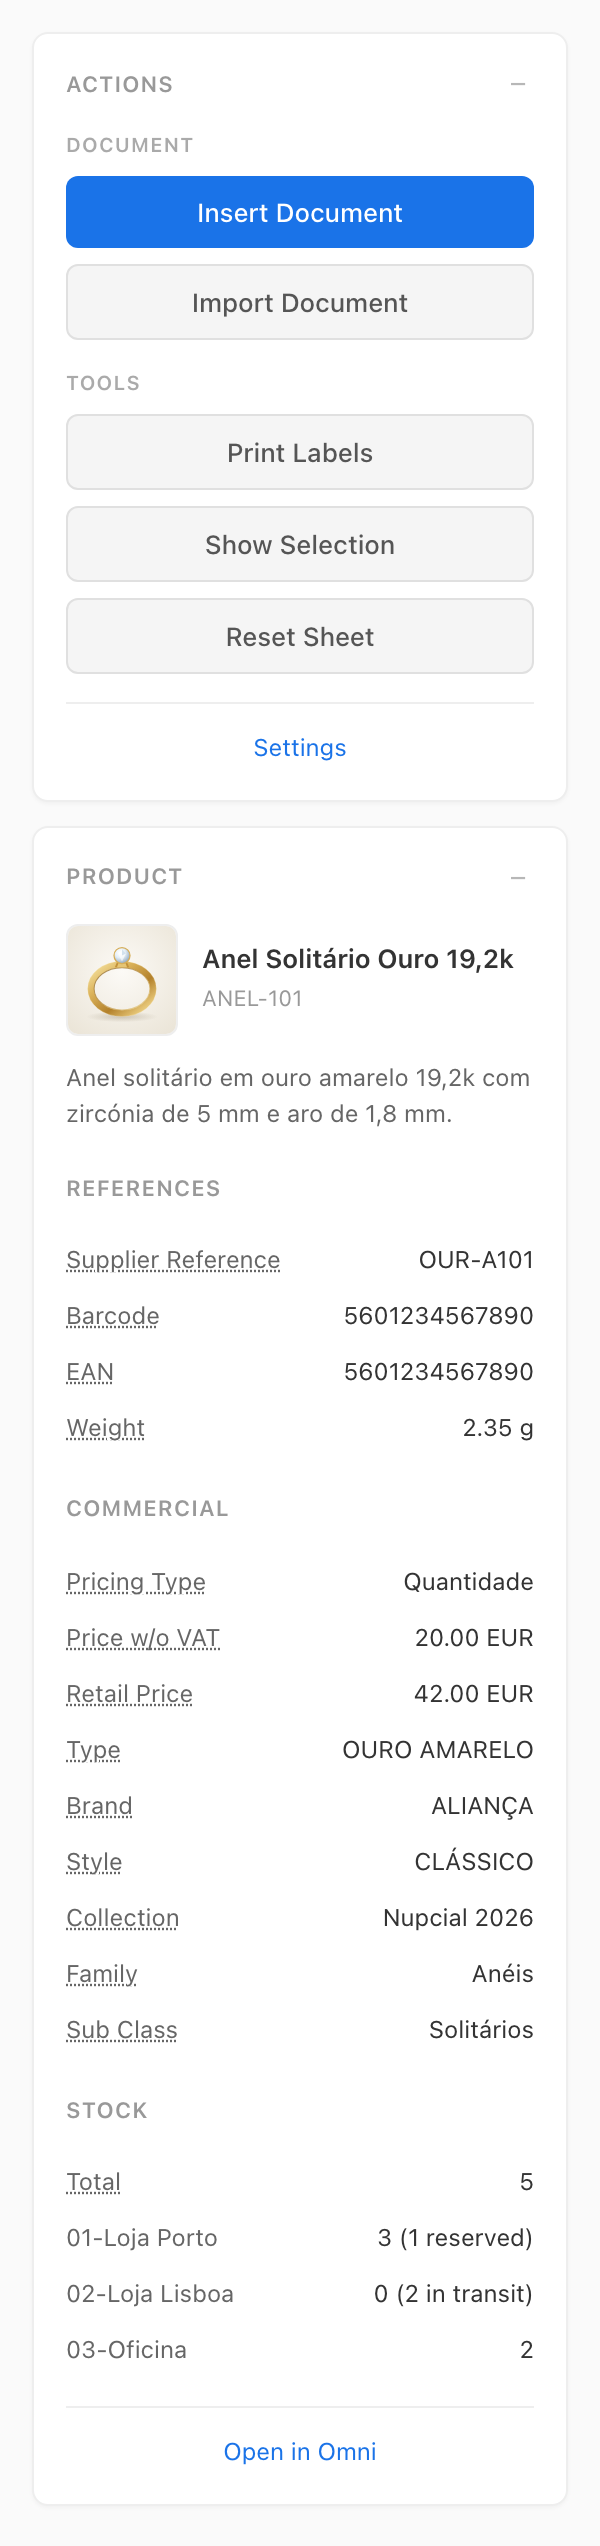
In the Google Sheets add-on the same panel is refreshed by the Show Selection button, because the selection change of Apps Script runs in a simple trigger, which may not reach Omni:
6. Inspect the supplier and the created document
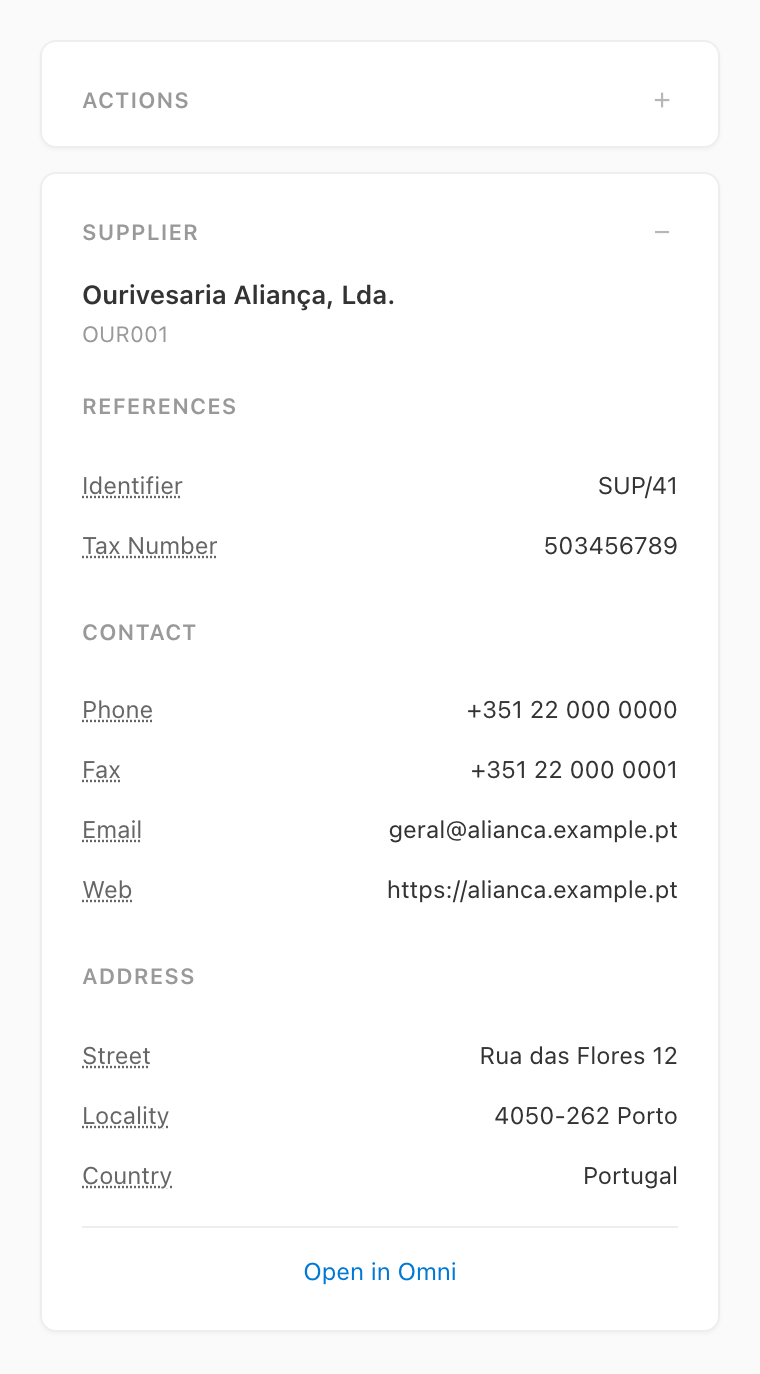
Selecting the supplier cell of the header describes the supplier instead of a product, with its references, contacts and address:
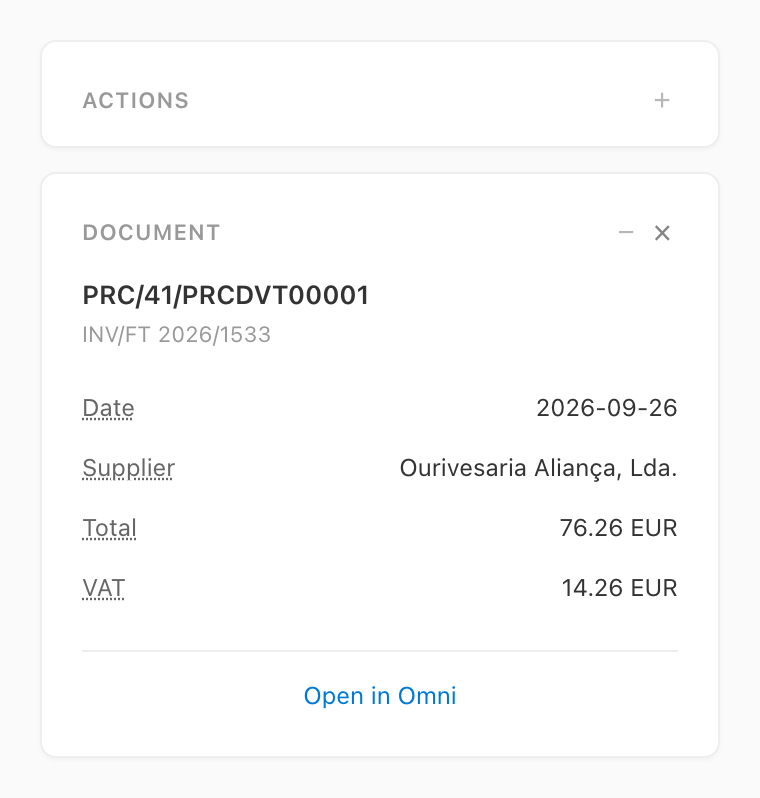
Inserting a document describes what was created. That panel is not tied to the cursor: it stays until it is dismissed with the control on its right, so the identifier can be checked against the paperwork after moving on.
When some prices of the lines could not be written (Omni or the connection failing while they were, after being tried again for about two minutes), the panel names the rows left without them and shows Resume prices, which writes them again from the rows as they are now. The workbook keeps them, so they are offered again when the taskpane is opened later on that sheet. A row changed since the document was created, while its prices are tried again included, is refused rather than written to another product, and resetting the sheet forgets the prices left.
Every panel minimizes to its title by clicking its header, which frees the room for the ones being read. Both screenshots above show the actions panel minimized.
Moving from one line to another keeps the panel on screen with what it last described until the new read lands. A small ring next to the panel name says that it is being read again, so that what is shown is never taken for current when it is not:
Clicking the image of the product opens it over the panel at the largest size Omni keeps for it, to read the detail. Close it with the backdrop, with the Escape key or with the control in the corner:

7. Import a scanned document
With a Digitizer URL in the connection, an Import Document button shows in the actions. It turns a supplier document (a PDF or a photo, up to 10 MB) into the lines of the sheet: Digitizer reads the document, and the toolbox writes what it read through the same calculations a typed line goes through. The button opens the import view in place of the actions, like the settings, with two tabs: Scan and Review, the second one enabled once a document has been read. Back returns to the actions and clears the import view (the review, the search and the scan profile chosen), so that the next import starts clean.
On the Scan tab pick the Scan Profile (the extra context the document is read with), then click Scan Document and choose the file. The document is read in the background, and the scan can be followed or cancelled while it runs:
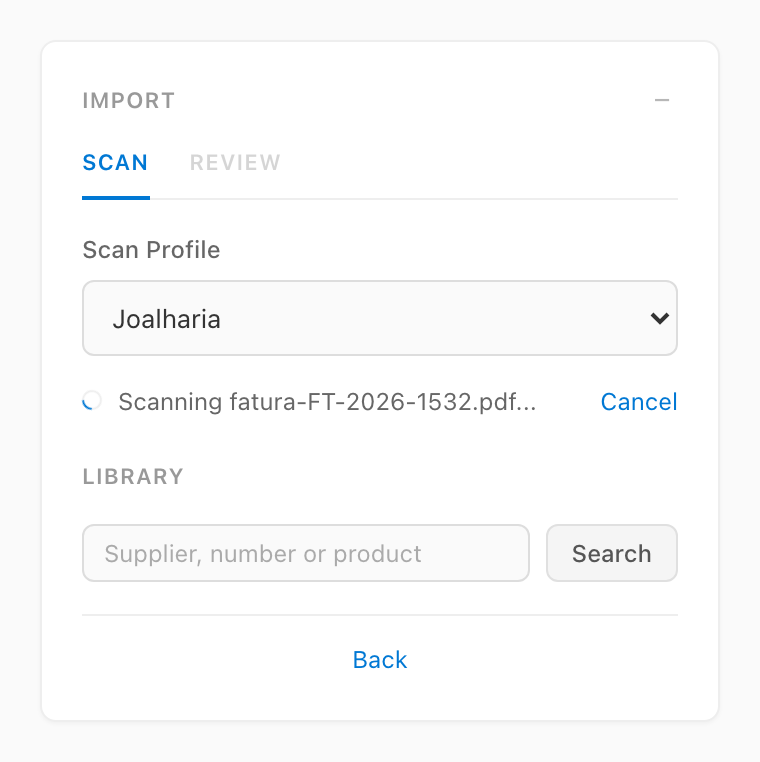
Follow opens the page of the reading in Digitizer in a new tab, where every document of the scan shows its progress as it is read. The link can be shared with whoever wants to watch a long document without waiting in front of the sheet.
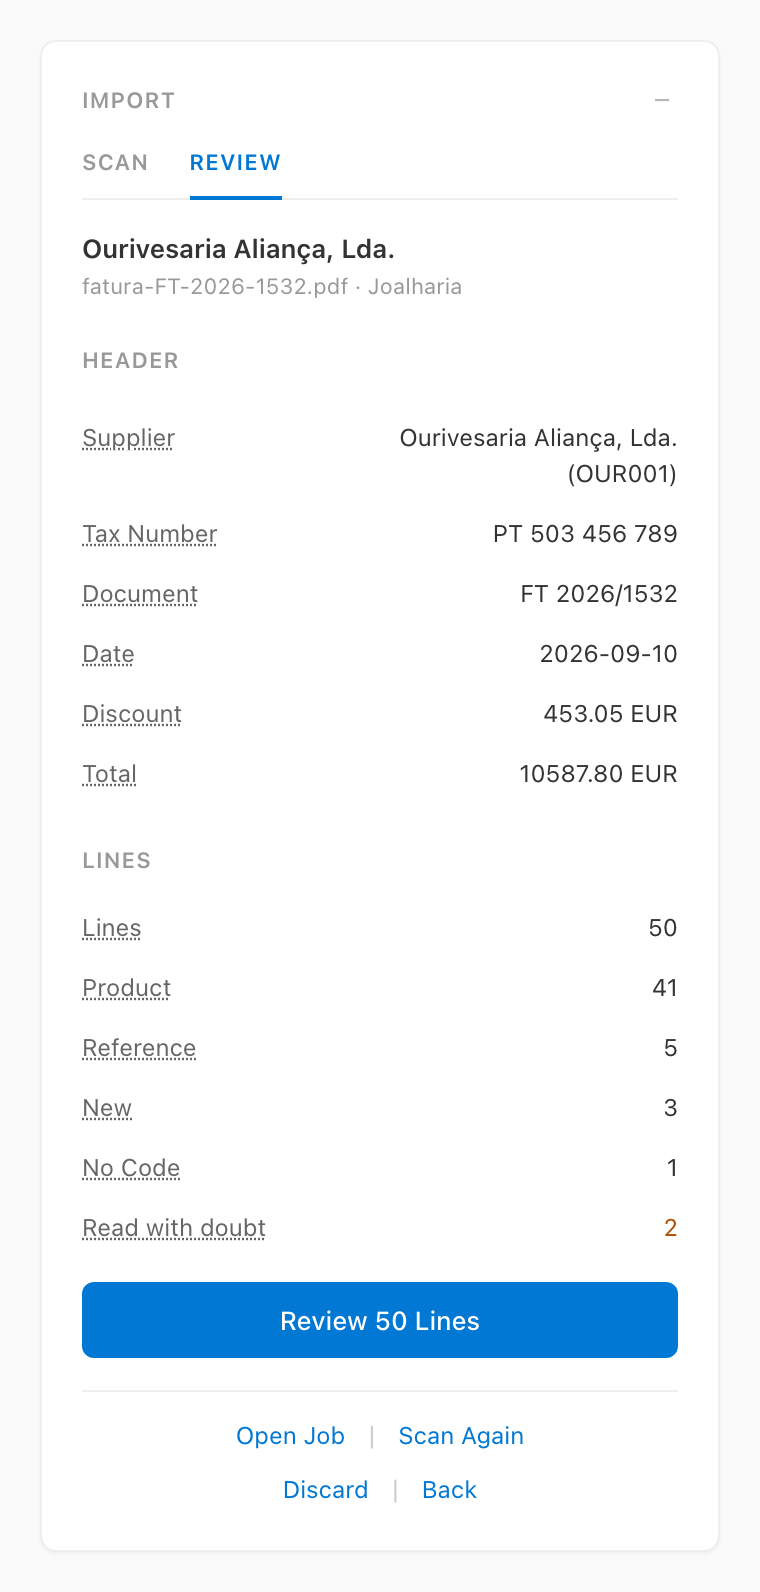
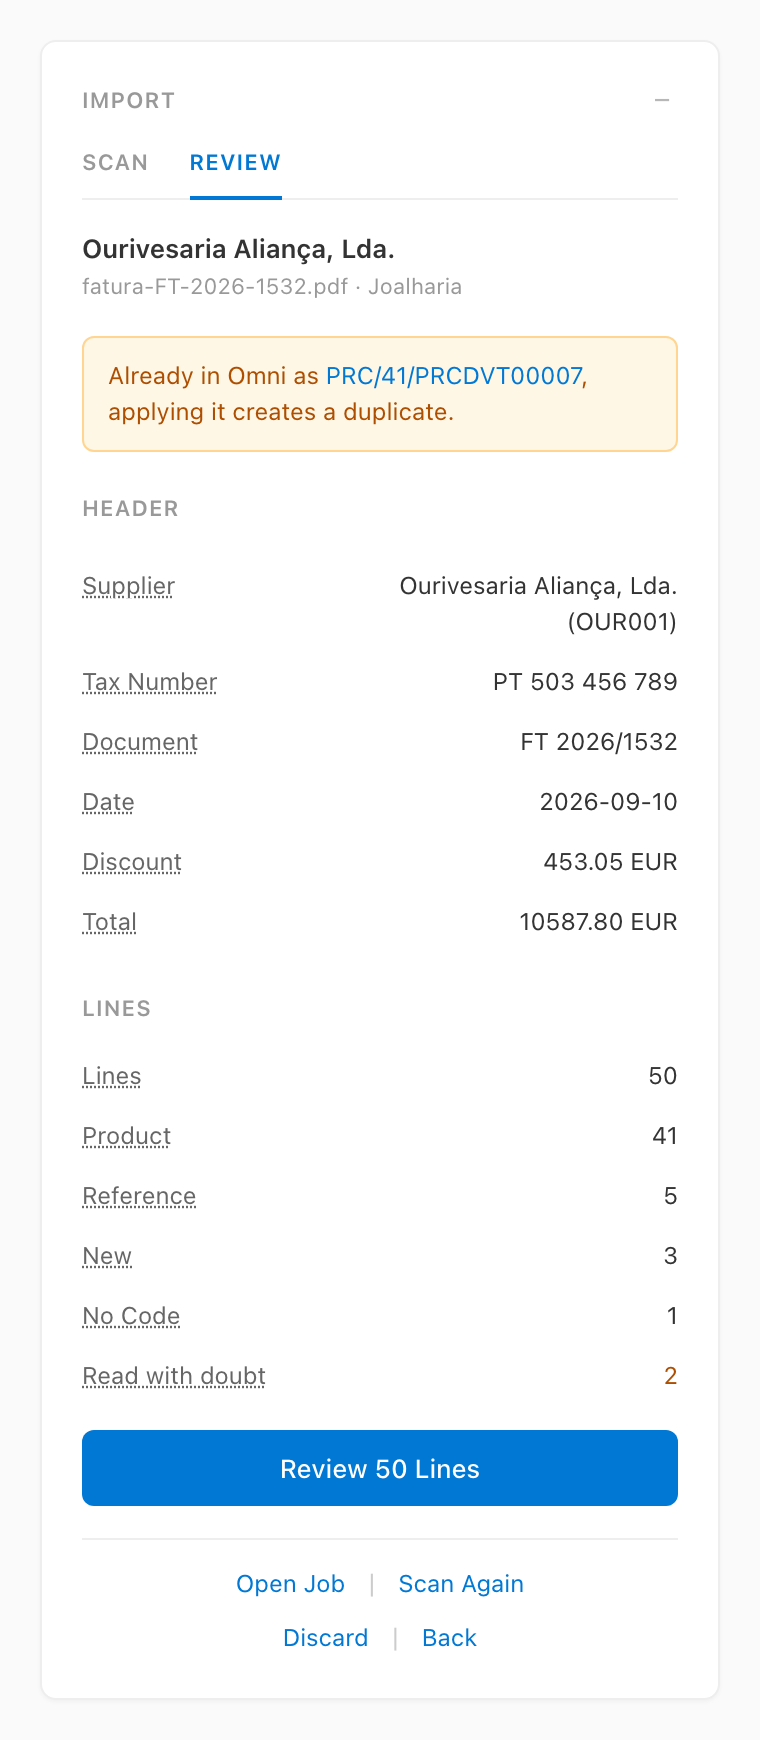
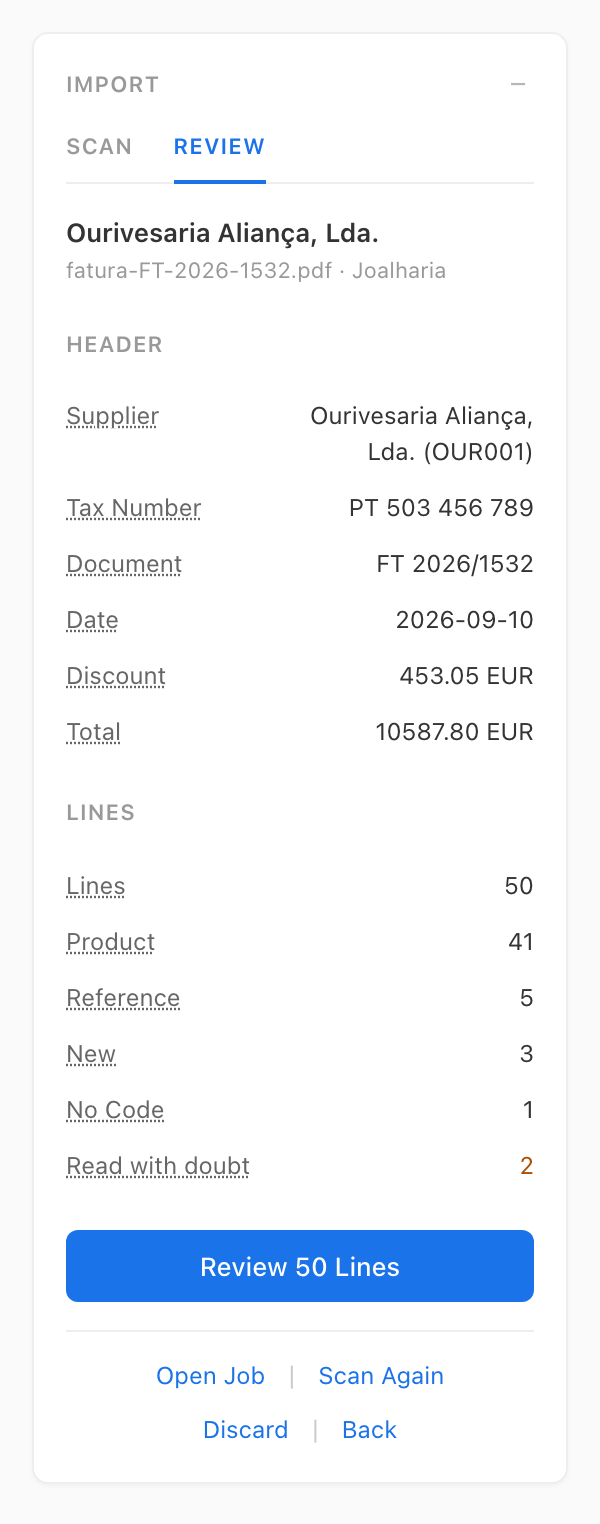
Once the document is read its progress says that it is being reviewed (its lines are matched against Omni, which takes a moment for a long document), and the Review tab then opens with what the import writes before anything is written: the supplier found by its tax number (or by its name when no supplier has the tax number, small differences of the name being seen through, the supplier then being marked as matched by name with how close the match is, to be checked before applying), the document number, date, discount and total, and a summary of the lines (how many there are, how many matched each way and how many were read with doubt):
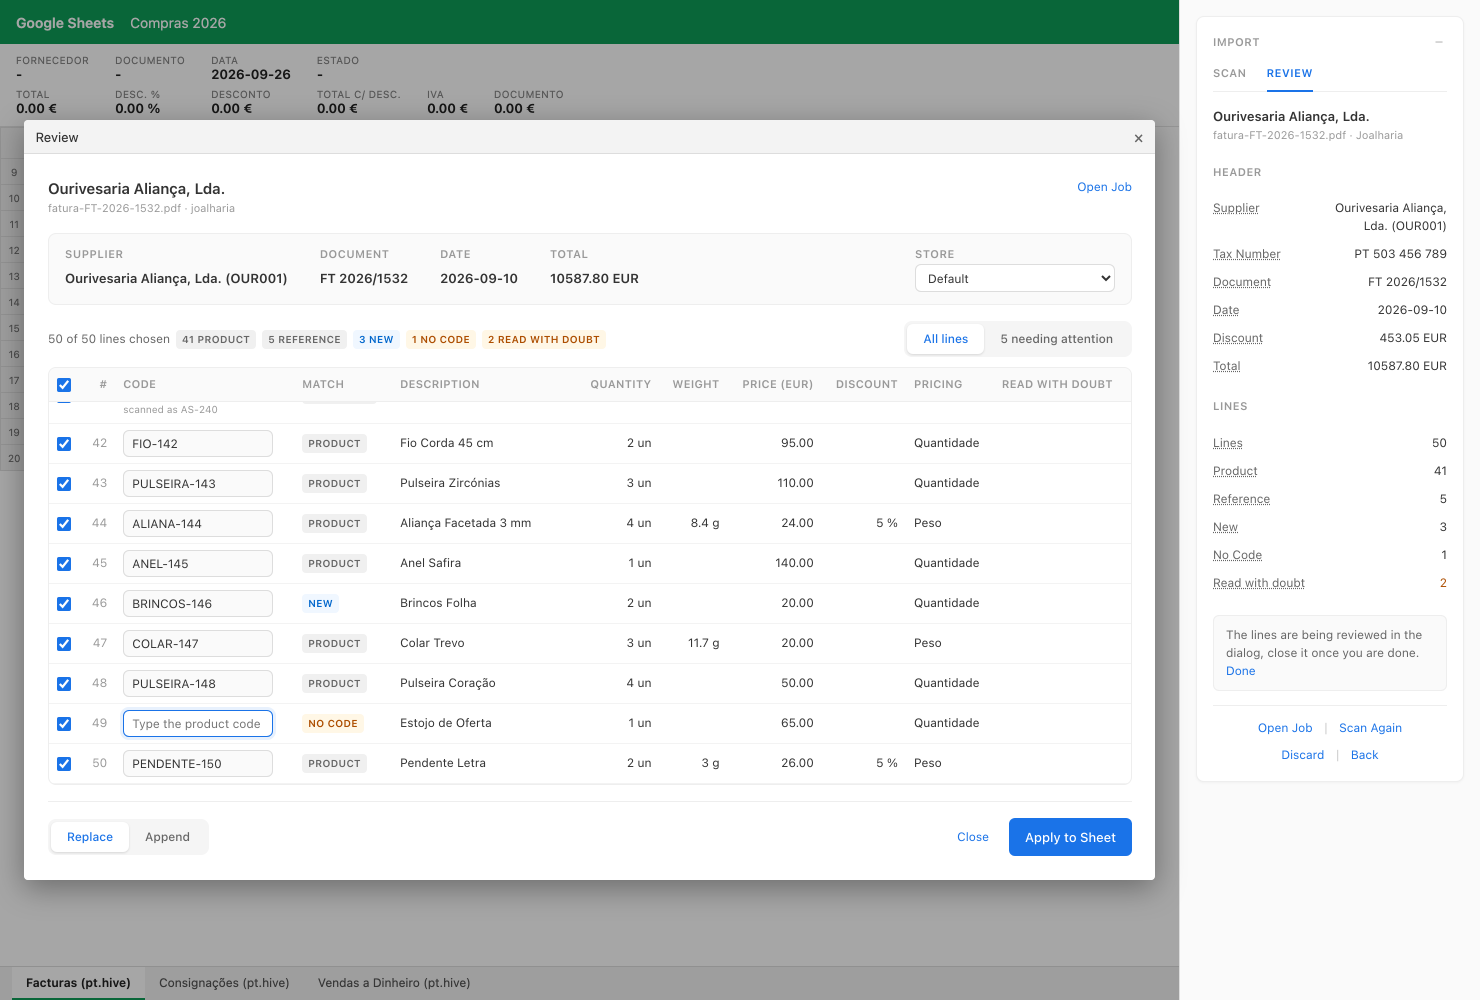
Review Lines opens a dialog over the workbook: the document and its facts at the top (the supplier, the number, the date and the total), and every line of it in a table (its code, match, description, quantity, weight, price, discount and pricing type), with how each one matched Omni:
- Product: a product with that code exists
- Reference: a product has that supplier reference, the line is written with its own code
- New: no product has that code, inserting the document creates it, keeping the code of the supplier as its reference so that the next document of the supplier matches it
- No Code: the document names no code for the line, type one before applying
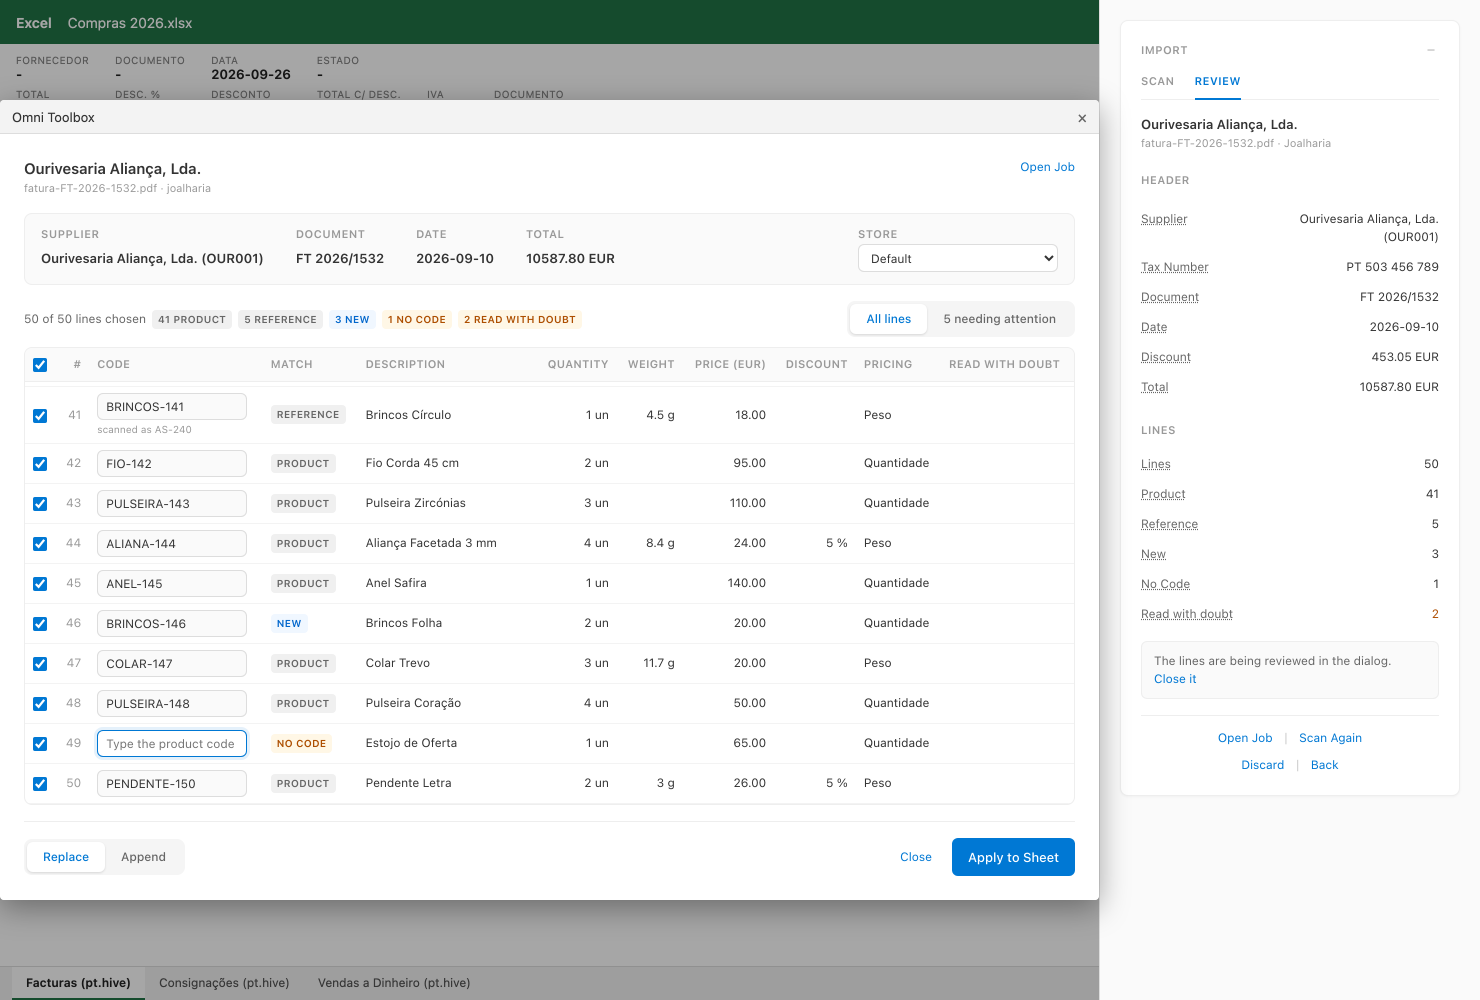
A field Digitizer was not sure about is marked Read with doubt, worth checking against the paper (Open Job opens the job that read the document in Digitizer, in a new tab, with the original and everything that was read from it). The switch above the table goes from All lines to the ones needing attention (the new products, the lines without a code and the lines read with doubt), and the checkbox of the header ticks or unticks every listed line. Untick the lines to leave out, type the missing codes (and the code of the supplier when none has the tax number), pick the Store the lines are for (Default keeps the store the sheet would use anyway, and the prices of a product are the ones it has in the store of its line), pick Replace (the sheet is cleared first) or Append (after the last line) and click Apply to Sheet. The totals of the sheet are then compared with the ones the document prints, a difference above one cent being named with both values, in the dialog and in the panel:
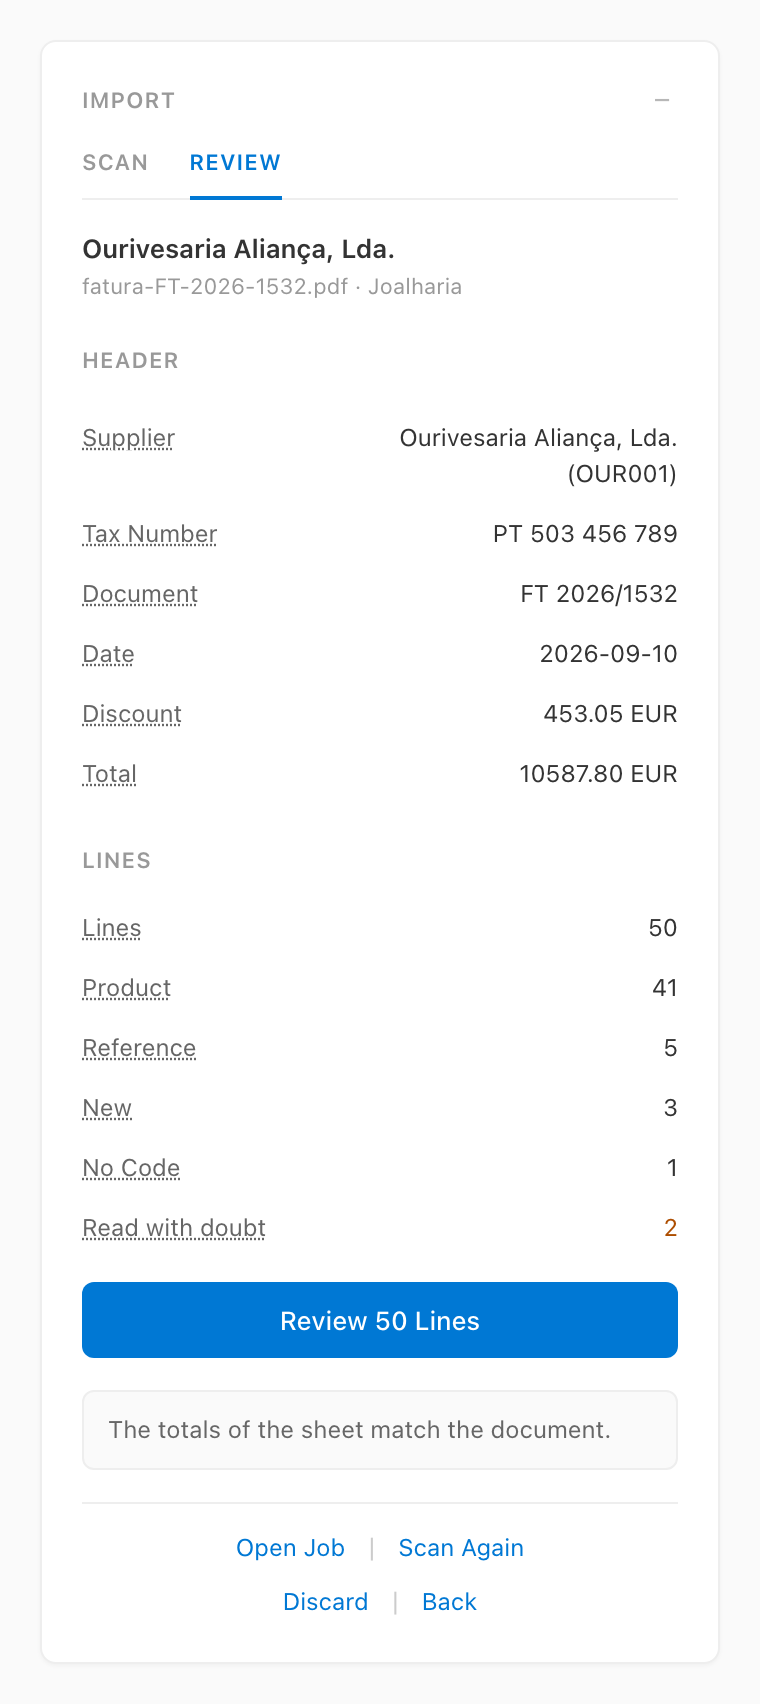
Closing the dialog keeps the choices made in it for the next time it is opened on the same scan, and Discard forgets the review altogether.
The discount of a line priced by quantity is sent to Omni with the line rather than taken off its total, so a document whose subtotal already deducts it shows that difference. Scan Again reads the document once more with the selected scan profile.
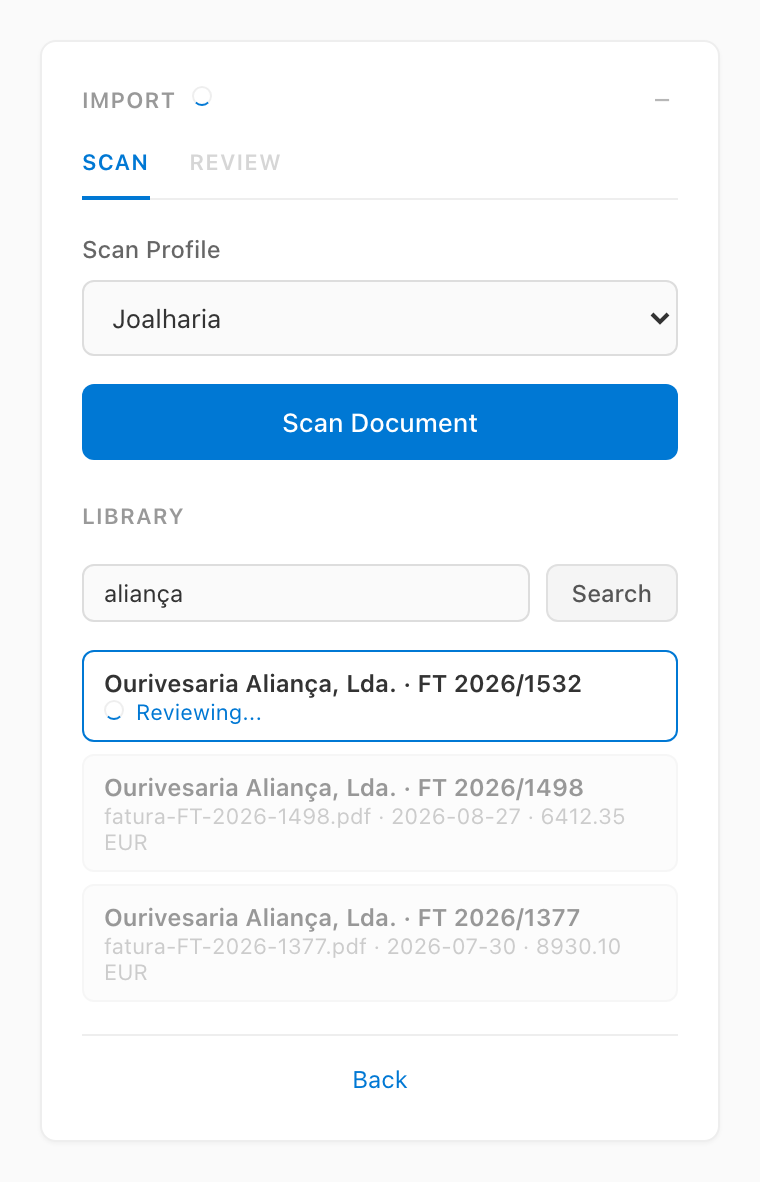
The Library of the Scan tab searches the documents Digitizer already read, by supplier, number or product. Picking one reviews it the same way, the document saying that it is being reviewed while its lines are matched against Omni:
A document Omni already holds is flagged before it is applied a second time:
The scan profiles are shared by everyone using the Digitizer instance and are managed from the settings page of Digitizer. A supplier whose documents need a hint to be read right (a column holding its reference, prices per gram) gets a scan profile saying so.
In the Google Sheets add-on the same panels live in the sidebar, and the dialog opens over the sheet, which stays readable while the lines are reviewed:
8. Update the fields of the products
The toolbox also writes the fields of the products that the columns of the table do not cover, like the EAN, the barcode or the description, in two ways: from the lines of a document, and from a sheet listing the products.
In the Facturas (pt.hive), Consignações (pt.hive) and Vendas a Dinheiro (pt.hive) sheets, every column after the table (from column AQ) whose header in row 8 names a field of the product in Omni is a field column. The header is the name Omni knows the field by, case and spaces aside: EAN and ean name the same field, and Retail Price names retail_price. A header naming a field the product does not have (a typo, or a Portuguese label like Descrição) is ignored.
- Typing a product code fills the field columns of its line with the current values of the product, and blanks them for a new product.
- Insert Document writes the values of the field columns to the product of every line. An empty cell leaves the field as it is in Omni (it never clears it), the code of a product cannot be changed from a column, and the columns of the table come first: the weight of a line is the one of its weight column, and the prices are the ones of the table (a
retail_pricecolumn is ignored in these sheets). - Reset Sheet clears the field columns of the lines too, keeping their headers in row 8.
- The cursor stays on the line while it moves through the field columns, and moves to the next line past the last one with a header.
The field columns work the same way in the Google Sheets add-on.
The products sheet lists products to update without a document. Create Products Sheet, in the Products group of the actions, adds a Produtos (pt.hive) sheet to the workbook, or goes to it when the workbook already has it. Its first row is the header: Cód. Produto in A1, then one field per column from B1 (the sheet is created with description, ean, barcode and retail_price, its titles styled and colored like the sections of the document sheets and kept in view while scrolling, and the columns can be added, removed or renamed as needed). Every row below it lists a product by its code in column A.
- Typing a code in column A fills its row with the current values of the product. A code Omni does not know is marked red and the fields of its row are blanked.
- Selecting a cell of a row shows its product in the Product panel, as on the lines of a document (see section 5). The panel hides for a row without a code and for a code Omni does not know, which no document creates here, and is read again once Update Products is over, so that it shows what was written.
- Update Products writes every row to Omni: the fields to the product, and
retail_price(the price with VAT) to every store that carries the product, whatever the All Stores setting, Omni working out the price without VAT. An empty cell leaves the field as it is, and a row with nothing to write is left alone. - A header starting with
metadata.names a key of the metadata of the product instead of one of its fields:metadata.brand_nameis itsbrand_namekey. Typing a code fills the column with the value of the key, blank when the product does not have it, and Update Products writes the key while keeping the other keys of the metadata, adding it to a product that does not have it yet. A key that holds a number takes a number only,metadata.pricing_typetakesweightorquantity(orPesoorQuantidade, the names the sheets show for them), and a key that holds a list or a map is left out and named among the ignored columns. These columns belong to the products sheet: in the document sheets such a header is ignored. - A row without a code is skipped, the products below it being updated as well.
- Reset Sheet on the products sheet clears its products (every row below the header) and restores its colors and formats, keeping its header as it is: the default titles are written again only to a header that is not in the format (
Cód. Produtofollowed by a field). - The button is enabled only while the products sheet is focused and its header starts with
Cód. Produtofollowed by at least one field, so it shows disabled on the other sheets, as in the screenshot of section 4. - Print Labels on the products sheet asks for the store whose prices the labels carry, the sheet having no store column, then prints one label per product, or as many as a
count(orlabels) column says when the sheet has one: an empty cell prints one,0prints none, and a count that is not a whole number from 0 to 100 skips the row. That column is no field of the product: Update Products leaves it out and typing a code leaves it as it is.
The outcome shows at the top of the taskpane, naming the products that were not updated and the columns that were ignored, for example 2 product(s) updated, 1 product(s) not updated, columns ignored: colour. A product is not updated when Omni does not know its code, when its retail price is not a number (a price typed as text uses a dot or a comma and two decimals at most, 12.50 or 12,50), when no store carries it, or when Omni refuses the update. Nothing is written into the sheet itself: its B7 cell is a value like any other, which the toolbox leaves alone.
The outcome of Print Labels shows the same way, for example 5 label(s) sent to the printer, 1 product(s) without labels, a product having no label when Omni does not know its code or its count is not a whole number.
The products sheet and Update Products are part of the taskpane of the Excel add-in only: the ribbon has no button for them (its Print Labels opens the taskpane to ask for the label and the store on the products sheet), and the Google Sheets add-on has neither.
Errors
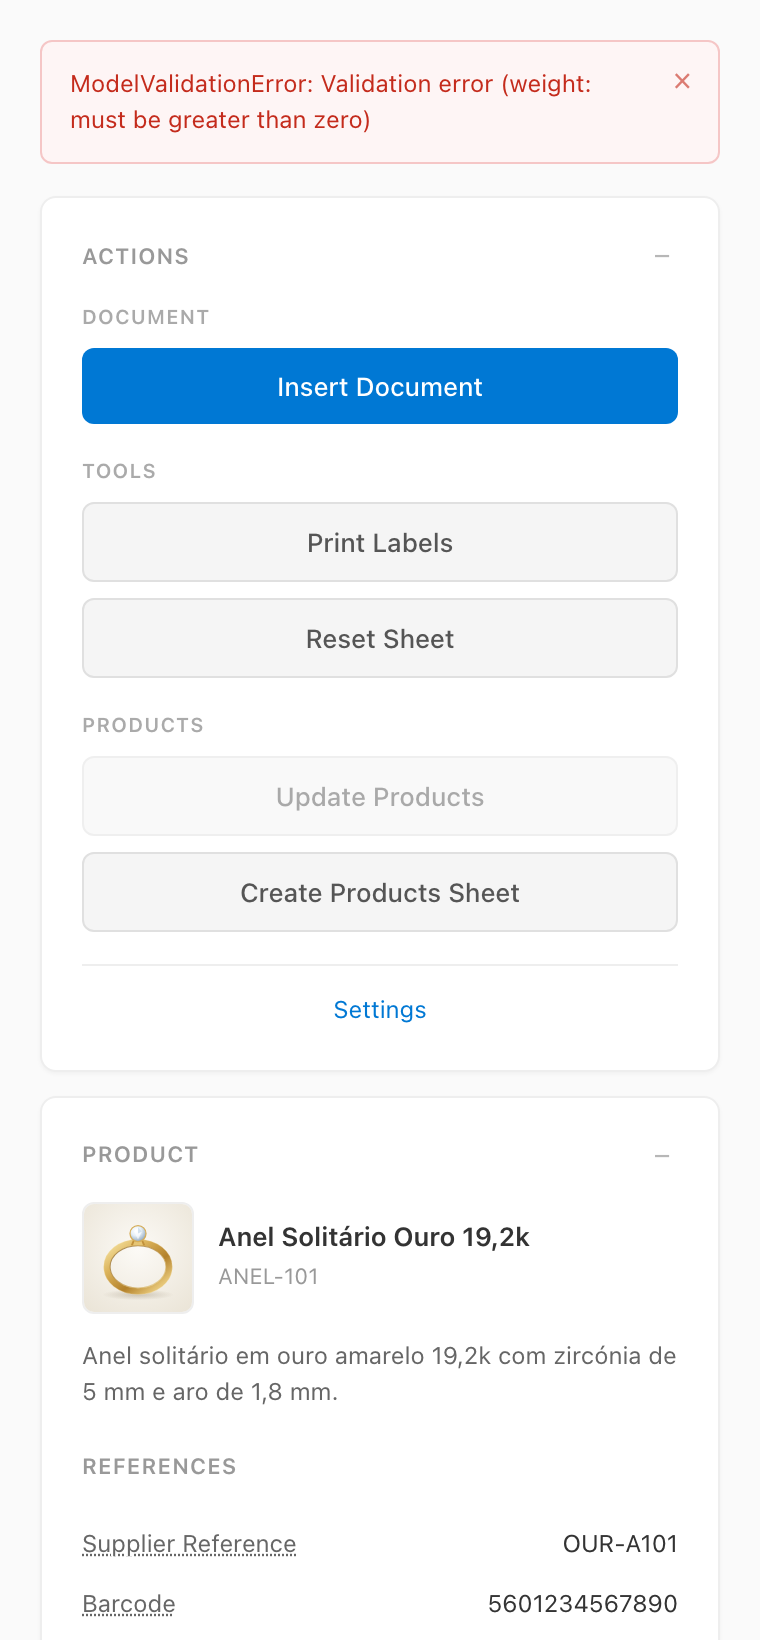
A failed action reports what Omni said at the top of the taskpane, above every panel, naming the fields to correct when the failure is a validation one. The message stays until it is read and is dismissed with the control on its right:
Troubleshooting
- "This add-in only works with Excel" — this warning is shown when the taskpane page is opened directly in a browser tab, outside of an Excel host. It is expected in that context and harmless; inside Excel Online it does not appear.
- Ribbon buttons disappeared — the sideloaded manifest is session-scoped; re-upload it as described in step 2.
- Connection fails — verify the API URL is reachable and the credentials are valid; try toggling the Use Proxy option.
- The import cannot reach Digitizer: with Use Proxy on, the Digitizer host must be one of the hosts the deployment proxies (
PROXY_ALLOWED_HOSTS); with it off, the add-in origin must be listed in theDIGITIZER_CORS_ORIGINSof the Digitizer instance. - A document is refused: Digitizer reads PDF, PNG, JPEG, WebP, TIFF and HEIC files of up to 10 MB.
- Checking the deployed version — the running build is identified by
/VERSION(release version),/COMMIT(git SHA) and/BUILD_DATE(Unix timestamp), shown in the About section of the settings too.